![[personal]](images/new_pill_personal.jpg) ![[interests]](images/new_pill_interests.jpg) ![[contact]](images/new_pill_contact.jpg) ![[resume]](images/new_pill_resume.jpg) ![[links]](images/new_pill_links.jpg) |
||

|
||
|
BUILDING A FOOSBALL TABLE
The parts can be ordered. The cabinet is just solid, simple wood construction. Hmmm.. So we started the research and realized we could have our own Tornado-like table for around $300. If you have a woodshop, the know-how and the desire to play foosball (combined with a little hint of perfectionism), keep reading.
STEP 1: Recon
STEP 2: Research
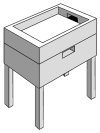
STEP 3: Design
STEP 4: Gather Materials
STEP 5: Construction
 This image shows the cutouts required
in six places on various parts of the table. They are all similar; 8.375" across, 3" high, with
rounded corners. The one pictured here is the back goal. The cuts were done using a drill
press with 1" Forsner bits (for the rounded corners), then a scroll saw with spiral blade for the
sides and tops. A bench spindle sander was then used to clean up the edges.
C. Next I assembled and painted the legs. The legs were assembled as four strips of the 3/4" birch plywood 29" high and 3.25" wide. I used offset butt-joints all around so when you look top-down you have a 4" x 4" square with a spiral pattern. I also cut 8 small 2.5" square blocks for the two end caps. They were assembled with heavy use of wood glue and clamps, working one joint at a time. I sanded, applied two coats of primer, sanded lightly, and applied a flat black enamel. I then had four black 4" x 4" x 29" rectangular prisms.  Here are the four legs; they are now ready for priming and painting (flat black).
The will be attached to the lower half of the cabinet (previous picture) with four 5.5" long 3/8"
bolts to allow for removal for transport. Note the holes in the bottoms of two so far for the
adjustable feet attachment.
D. Ahh, the playfield. The most delicate part of the entire operation. Now that I had the notches cut out of the two ends (inside the goal area to allow the ball to drop down into the ball-return system), I was ready to apply the playfield image. I printed the image using 18 sheets of paper, and cut each very carefully so they would tile perfectly. I started by marking the middle line in both directions on the playfield particle board, and used an artists' spray mount to spray on the back of the paper and then adhere it to the surface. I started in the center and worked out to the end pieces. I let it dry overnight. I placed the plexiglas sheet over the playfield to trace out the end notches. I cut the notches out of the Plexiglas so it perfectly covered the playfield surface. I then took 60-grit sandpaper on a random orbital sander and sanded one side of the Plexiglas until I could see absolutely no glare (using a point light in the room to look for specular reflections). The sanding process took about ten minutes of constantly moving the sander around randomly (did not want an uneven surface if I were to use a regular pattern and "dig in" some parts more than others). Then I placed it on the playfield and taped around the edges to keep it secure temporarily. I drilled 1/8" holes about 4" apart all around the outer edge (3/8" from the edge) that were to be used to secure the playfield to the sides from the bottom later on.  E. The cabinet lower half.
This next image features the assembled lower half of the cabinet. Since the cabinet is split in
two halves (upper and lower) to allow for it to open, I started on the bottom half first.
The bottom half contains the legs and the ball-return system. Note the cutouts on the
sides for the ball return. In the photo it is upside down.
Here are some pictures of the legs attached to the base.

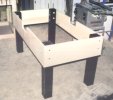 I had to work on some smaller details to finish the lower half; such as the ball-return
system and covering the bottom. I put 3/4" x 3/4" strips along the bottom sides
3/4" from the bottom edge on the inside, then set in particle board to cover the entire bottom; attaching
it to the aforementioned strips for support.
 F. The cabinet upper half. In order to create the side rails (which should end up 1.5" thick), I used wood glue to
adhere a 48"x4.25" piece to a 55.5"x6" piece, with the smaller piece centered left-right and flush with the top
(click here for a detail image).
I drilled all the holes in the side rails for the rods (1" diameter), and the ball serving hole (1.5").
After the playfield had the image applied, and the
Plexiglas cut and roughed, I fit all the upper half parts together and used woodscrews to
attach the sides (54"x6") to the ends (30"x6"). I then attached the playfield surface to the sides using
the holes I drilled earlier all around the 3/4" edge and wood screws up from the
bottom of the surface. I placed the inside backs (with the goal cutout) using wood glue
attached to the side rails. Click here
for a close-up top-view schematic of the end joints.
I finished it by attaching a thin veneer to the top surface of the back and side rails. Note: this was the most work-intensive part because of the precision required when working with veneers. See the finished photos to see the black veneer I used and how it looks in the finished form. 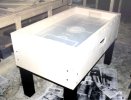 G. Final assembly and finishing touches.
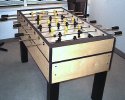
This picture shows the upper half placed on the lower half with all the legs
attached to give a rough feel for the finished product.
When it is lined up like the picture, I attached the two hinges to one side. I chose
to attach them to a smaller side (30") instead of the longer (55.5") so it opens
more like a car hood. I added veneer trim to the corners for effect. I used a rub-in
wood finish for a nice, protective covering. I then placed the plastic bushings
in the 1" diameter holes for the rods. I adhered the side trim strips to the inside
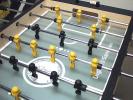
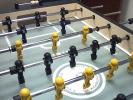
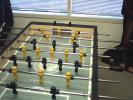
edges of the playfield (they come with a double-sided tape). I inserted rods and guys, and was done. See the following
pictures of the completed project.
STEP 6: Play
|
||
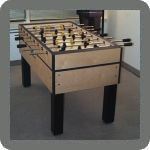 We had really been punishing our old, rickety Sportcraft table for a while
at work when we realized we needed a new table. A real foosball table.
We wanted the Cyclone II from Tornado, but when we saw the $1000 price tag,
we were all a bit despondent. We played on a Cyclone II at a local venue and
just had to have one, though. What to do?
 I played on a Tornado table and was amazed. I noticed some specifics
that make it a great table, such as:

