. home . interests . whipmaking .
 I'm a complete noob, just for the sake of complete disclosure. I'm putting together this page with tips, photos, and running
commentary as I try to eventually make a kangaroo hide 12-plait 10-foot American bullwhip.
Some interesting notes about my personality: I'm a perfectionist and a little obessive-compulsive. This could prove to be either a
blessing or a curse.
I'm a complete noob, just for the sake of complete disclosure. I'm putting together this page with tips, photos, and running
commentary as I try to eventually make a kangaroo hide 12-plait 10-foot American bullwhip.
Some interesting notes about my personality: I'm a perfectionist and a little obessive-compulsive. This could prove to be either a
blessing or a curse.
First, let me say that I had no clue how someone could take a strangely-shaped hide and turn it into the beautiful, perfect-looking whips I see people somehow create. Way back (14 years ago or so) I bought a superb 12-plait dark kangaroo-hide bullwhip, but that was the extent of my knowledge. I got interested by reading about all the whipmaking efforts on the IndyGear.com forums, and could not believe all these 'amatuer' whipmakers posting pictures of what looked like perfect whips. What the heck? How do you do that? A cursory look around the intarwebs revealed that kangaroo hides were well above $100. I wasn't about to buy something like that knowing full well I'd screw it up. I had so many questions and didn't even know where to start.
Where to actually start
I bought two books and read them:
Whips and Whipmaking
by David Morgan and
How to Make Whips
by Ron Edwards. Trust me, this
is where you need to start. They're around $15 a piece; I got them at Amazon. In Ron's book, the first whip he shows to make
is a very basic four-plait (four braid)
stock whip. A stock whip is a long-ish wooden handle with a whippy-part (thong) attached to the end of the handle. Even though
I wanted to make a bullwhip, I decided to start with the stockwhip, so I ordered some things from Murphy Whips online. This would be a good time
to say that I was really confused looking around online. A book would say "buy a vegetable-tanned something hide" or whatever, and
I couldn't find anything online or even knew how to look it up. I didn't know the terms. Chrome-tanned, vegetable tanned, greenhide,
redhide, rawhide, what? Well, in order to make the first stockwhip (assuming you bought that book), you need these things:
- 2-inch by about 7-foot strip of 1/8" thick redhide leather. It's just a big strip! No worrying about cutting around a big hide, and it's cheap for this first project. It costs about $34 at Murphy Whips.
- Some thread or artifical sinew. A spool is around $1 at Murphy Whips.
- A cracker (or popper). $11 for ten of 'em. Again, Murphy Whips.
- A 3/4"-diameter wooden dowel rod about 2 feet long (for the handle). Home Despot or Lowes, couple bucks.
- Leather dressing of some sort. Pecards or Jay-el. I got a small can at Murphy Whips for a few bucks.
- Whitehide fall (optional). I bought a pre-made whitehide fall from Murphy Whips for around $4, but this is optional to buy because you can make it from the redhide leather strip you buy.
Making the stock whip
 2008.03.28.
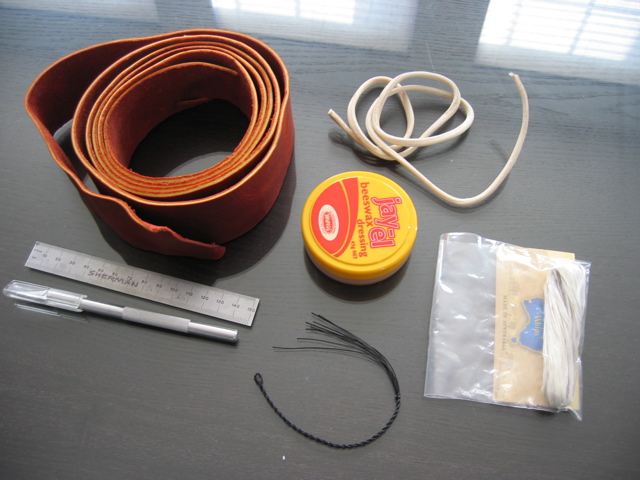
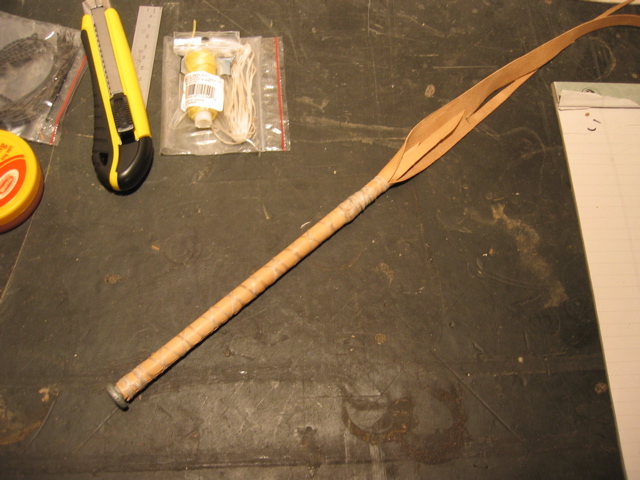
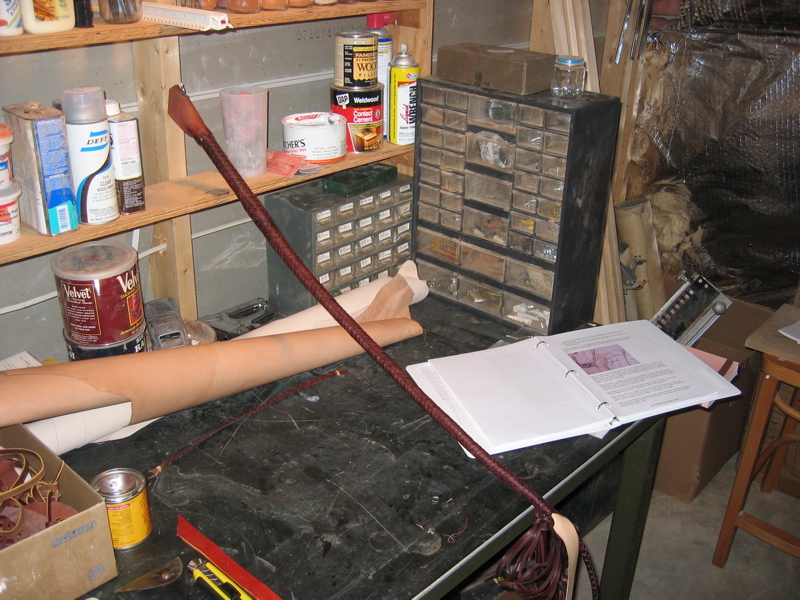
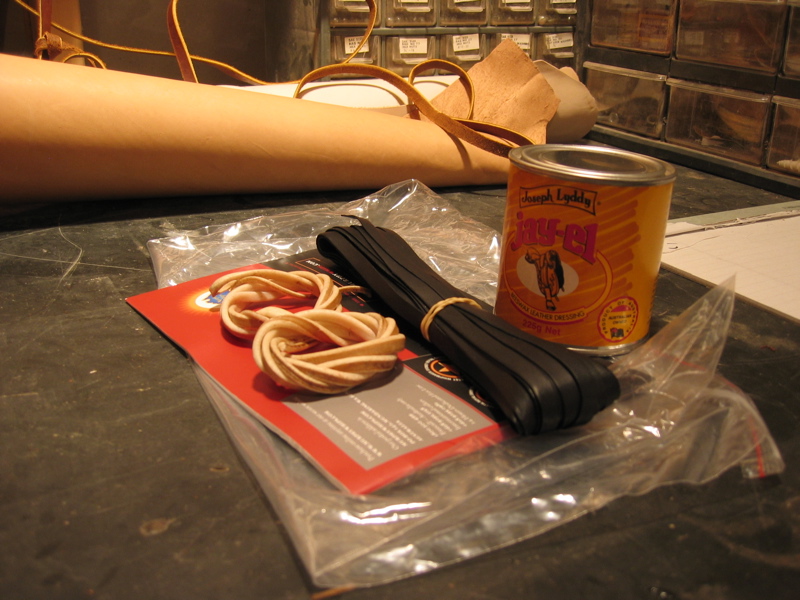
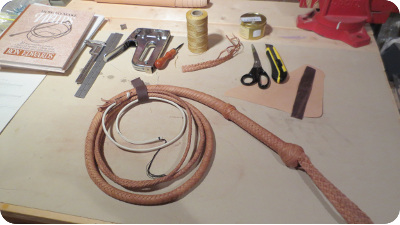
I ordered said items and they arrived about a week later. Pictured are the 2-inch (~50mm) strip of redhide, the whitehide fall, the leather
dressing (jayel), the artificial sinew, the cracker, and the tools I needed (exacto knife with sharp replacement blades and a ruler with both
mm and inch markings).
2008.03.28.
I ordered said items and they arrived about a week later. Pictured are the 2-inch (~50mm) strip of redhide, the whitehide fall, the leather
dressing (jayel), the artificial sinew, the cracker, and the tools I needed (exacto knife with sharp replacement blades and a ruler with both
mm and inch markings).
I cut out the main strands using the pattern in the How To Make Whips book. It was 40mm wide at the widest part, 4-plait, and was about 2 meters long. The four strands tapered down to about 2mm wide at the tips. This is going to be a 5-foot, four-plait redhide stockwhip.
 Next I made a core out of a tapered piece of redhide about 10mm wide at the widest part, down to a point. It was about 4 feet long.
I soaked this in water then rolled it so it was a round core for the middle of the whip (this is all in the book). I used the 4-plait
technique shown and started by hooking the four strands on a hook I put in the wall of my shop. I made sure to put plenty of leather
dressing on the strands, and started plaiting around the core I rolled earlier. As I went, I pulled each strand tight, then
braided it into place. As I've seen in several places pull tight, plait loose. I think that's the one big tip that makes
or breaks it. I then hitched on the fall (which took a good half-hour to figure out) and attached the cracker.
This completed the thong of the whip, with the handle yet to come.
Next I made a core out of a tapered piece of redhide about 10mm wide at the widest part, down to a point. It was about 4 feet long.
I soaked this in water then rolled it so it was a round core for the middle of the whip (this is all in the book). I used the 4-plait
technique shown and started by hooking the four strands on a hook I put in the wall of my shop. I made sure to put plenty of leather
dressing on the strands, and started plaiting around the core I rolled earlier. As I went, I pulled each strand tight, then
braided it into place. As I've seen in several places pull tight, plait loose. I think that's the one big tip that makes
or breaks it. I then hitched on the fall (which took a good half-hour to figure out) and attached the cracker.
This completed the thong of the whip, with the handle yet to come.
 The handle was made with a 3/4-inch dowel rod and some extra leather lace I picked up (it's a darker brown), but you should definitely
have enough left from the original leather strip.
I used two strands, each about 6 feet long and
about 10mm wide. I started with the middle of each looped around the handle, meaning I had a basic four-plait braid down at the bottom of
the handle. I finished with a simple crown knot. The keeper was lashed on with the artificial sinew. The thong was fed through and
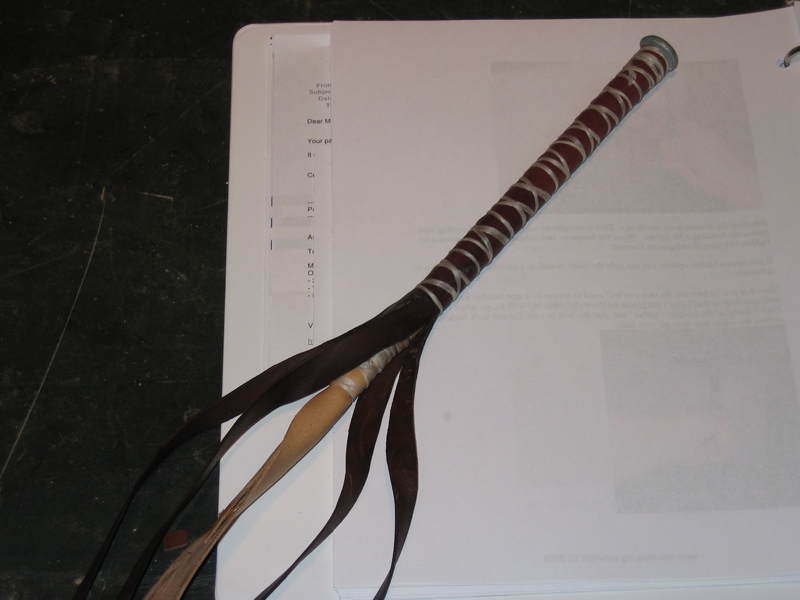
it was finished! Overall not too difficult, but then again, the finished product isn't exactly spectacular. It was definitely the best
way to get started, and was very easy to do as I just followed along in Edwards' book.
And as a bonus, it actually cracks!
The handle was made with a 3/4-inch dowel rod and some extra leather lace I picked up (it's a darker brown), but you should definitely
have enough left from the original leather strip.
I used two strands, each about 6 feet long and
about 10mm wide. I started with the middle of each looped around the handle, meaning I had a basic four-plait braid down at the bottom of
the handle. I finished with a simple crown knot. The keeper was lashed on with the artificial sinew. The thong was fed through and
it was finished! Overall not too difficult, but then again, the finished product isn't exactly spectacular. It was definitely the best
way to get started, and was very easy to do as I just followed along in Edwards' book.
And as a bonus, it actually cracks!
 Time for some observations and notes that may be helpful. First, cutting the strands was a little more difficult than I had
planned. I think because I was dealing with 2-3mm redhide, it is a thicker leather than kangaroo, so I had a hard time
controlling a straight line while at the same time cutting all the way through. I had to score a few cuts and found it slow going. I had
originally planned on a six-plait, but cutting out the skinner plaits in a thick redhide just didn't work... It would have
meant cutting strands at the end that were thinner width-wise than they were thick. Also, because of the thickness, I
found it difficult for the last foot of plaiting. Also, using plenty of leather dressing is key. Coat each strand well and let
it soak in. When you tighten strands as you go it makes for a tighter plait and is easier to work with.
Time for some observations and notes that may be helpful. First, cutting the strands was a little more difficult than I had
planned. I think because I was dealing with 2-3mm redhide, it is a thicker leather than kangaroo, so I had a hard time
controlling a straight line while at the same time cutting all the way through. I had to score a few cuts and found it slow going. I had
originally planned on a six-plait, but cutting out the skinner plaits in a thick redhide just didn't work... It would have
meant cutting strands at the end that were thinner width-wise than they were thick. Also, because of the thickness, I
found it difficult for the last foot of plaiting. Also, using plenty of leather dressing is key. Coat each strand well and let
it soak in. When you tighten strands as you go it makes for a tighter plait and is easier to work with.
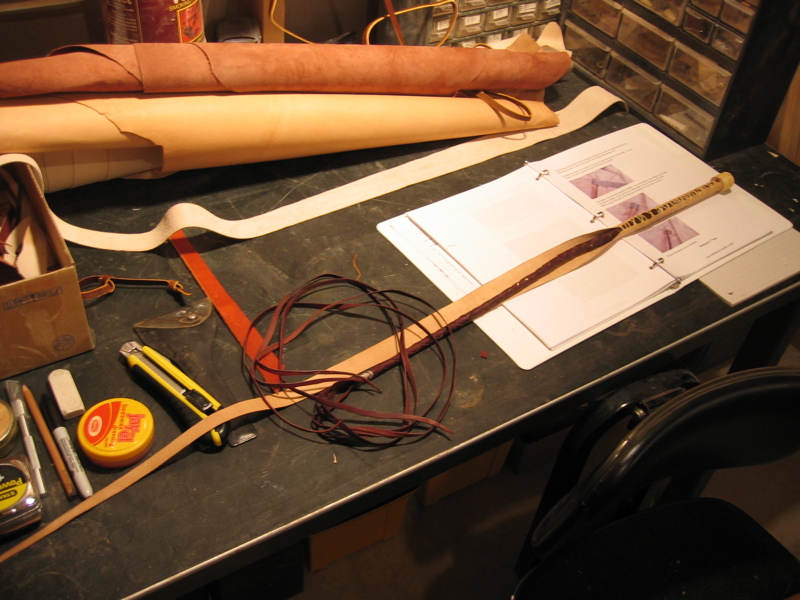
One major flaw in my whip is I did not skive at all (bevel, or cut angles on the underside of the strands). I found it impossible. I have no idea how people do that. I tried but found my cut going all over the place, cutting way into the side of the strand at times. I'm going to have to either figure out how to do that or just use really thin leather (kangaroo) that doesn't really even need to be skived. This is the main thing I need to figure out before I start my next whip. Maybe a better knife will help.
Bullwhip or roo stockwhip?
2008.04.03.
Not sure which one yet, but I'm thinking about an eight- or twelve-plait bullwhip or maybe the nicer roo stockwhip
in Ron Edwards' book. Depends on how comfortable I feel buying the hides.
I purchased Louie's great ebook on Bullwhip making, so I may jump right into attempting my first bullwhip.
So far I've been preparing by doing the following:

- Purchased a better knife (with replacable blades - this Stanley knife - $10).
- Bought a 8-inch spike for the base of the bullwhip handle (at my local hardware store - $0.45).
- Ordered a kip hide (for the core and bolsters) and some artificial sinew from Tandy Leather (total $70).
Bullwhip
 Ok, so I've pretty much decided to jump in head-first with trying to make a bullwhip.
I'm going to be following the construction tutorial outlined by Louie in his
Bullwhip Making For Beginners book.
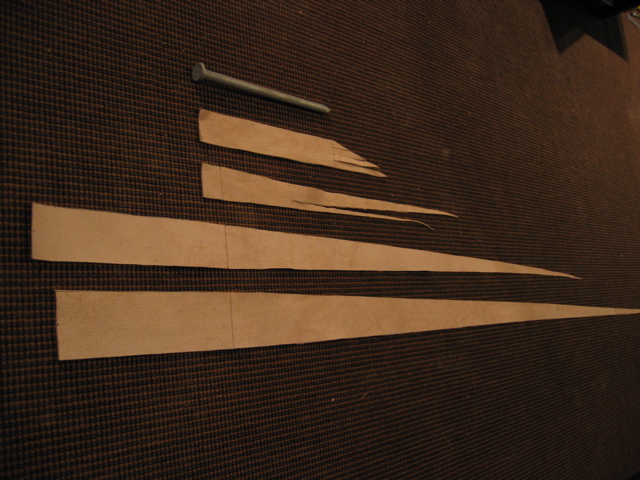
Here are a few pictures of the first kip leather pieces cut out for the new bullwhip. The first picture is of
the kip hide I ordered. I've traced out the core and the two bolsters up near the top.
The second pic is
everything cut out: from bottom to top is the second bolster, the first bolster, the core, and
the wear leather that goes directly around the handle nail base. Click the images to embiggen.
Ok, so I've pretty much decided to jump in head-first with trying to make a bullwhip.
I'm going to be following the construction tutorial outlined by Louie in his
Bullwhip Making For Beginners book.
Here are a few pictures of the first kip leather pieces cut out for the new bullwhip. The first picture is of
the kip hide I ordered. I've traced out the core and the two bolsters up near the top.
The second pic is
everything cut out: from bottom to top is the second bolster, the first bolster, the core, and
the wear leather that goes directly around the handle nail base. Click the images to embiggen.
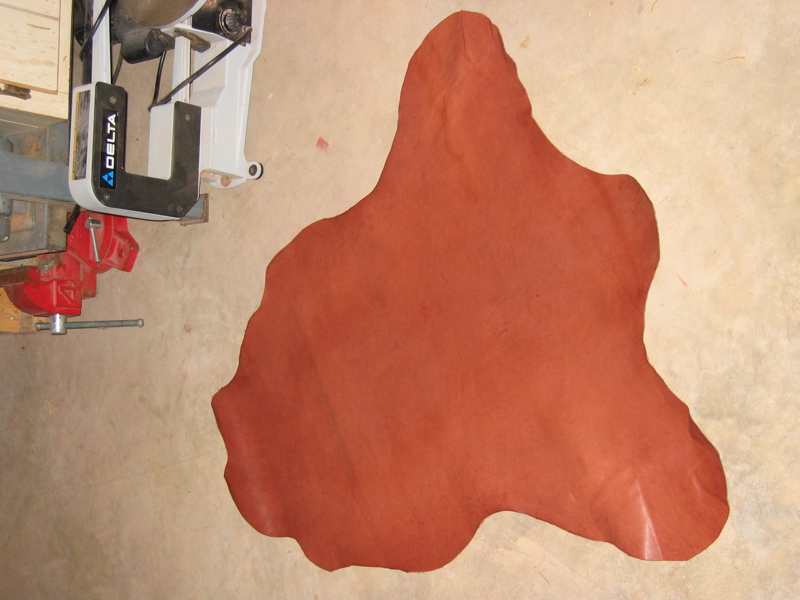
Now I just need to figure out what kangaroo hide to order. I need a piece that is about 55 dm2 in size, under 1mm thick, and that'll run probably $90 to $120. Not cheap. Still waiting to hear back from a few sources, but in the mean time I can start by putting leather dressing on the core pieces and begin building up the core on the nail handle.
 2008.04.13.
I finally found a kangaroo hide! It's a 55 dm2, 2.5-oz brandy-colored veg-tanned hide. I got it on ebay for
a surprisingly low price ($48!). Should arrive in a week or two from Australia. I think I may order some separate
black kangaroo lace to use on the knots,
giving the whip a bit of a Kingdom Of The Crystal Skull look (as seen here). This will also leave more
of the hide for me to use for the bellies and overlay.
I'd hate to run out of hide for the overlay having wasted it on simple single-width lace that I may want to be a
different color anyways.
2008.04.13.
I finally found a kangaroo hide! It's a 55 dm2, 2.5-oz brandy-colored veg-tanned hide. I got it on ebay for
a surprisingly low price ($48!). Should arrive in a week or two from Australia. I think I may order some separate
black kangaroo lace to use on the knots,
giving the whip a bit of a Kingdom Of The Crystal Skull look (as seen here). This will also leave more
of the hide for me to use for the bellies and overlay.
I'd hate to run out of hide for the overlay having wasted it on simple single-width lace that I may want to be a
different color anyways.
 While I wait for the roo hide, I've started by putting the leather dressing on all the bolster and core pieces,
and attached the wear leather and core to the handle nail with artificial sinew.
In the meantime I've also been getting my shop organized for this new hobby; plenty of work space and hooks
in the walls for use in hanging leather and doing the plaiting work.
I also ordered another roo hide from Hardtke, and that will probably arrive before the one I got on ebay.
It's a natural drum-stuffed hide probably about 65 dm2 in size - I'll probably use this one for my
second bullwhip which I'll try to make a bit longer (8-feet). I still need to order some more leather dressing
and some whitehide falls.
While I wait for the roo hide, I've started by putting the leather dressing on all the bolster and core pieces,
and attached the wear leather and core to the handle nail with artificial sinew.
In the meantime I've also been getting my shop organized for this new hobby; plenty of work space and hooks
in the walls for use in hanging leather and doing the plaiting work.
I also ordered another roo hide from Hardtke, and that will probably arrive before the one I got on ebay.
It's a natural drum-stuffed hide probably about 65 dm2 in size - I'll probably use this one for my
second bullwhip which I'll try to make a bit longer (8-feet). I still need to order some more leather dressing
and some whitehide falls.
 2008.04.22.
Now it's the waiting game. I got my natural roo hide already (because it was from a place in the U.S.),
so I'm still waiting on
the brandy-colored hide that will become my first bullwhip. The natural roo hide is so nice that I want to
wait and use it for my second bullwhip. I also am waiting on some leather dressing, roo lace (black), and falls that I ordered from
Australia.
2008.04.22.
Now it's the waiting game. I got my natural roo hide already (because it was from a place in the U.S.),
so I'm still waiting on
the brandy-colored hide that will become my first bullwhip. The natural roo hide is so nice that I want to
wait and use it for my second bullwhip. I also am waiting on some leather dressing, roo lace (black), and falls that I ordered from
Australia.
Cutting the bellies and overlay, plaiting
2008.04.23. This is the part that scares me the most. I'll be cutting out two 4-strand bellies, and a 12-strand overlay. I've been practicing my cutting using a small part of the kip that I cut off just to try to make some lace cut in a spiral fashion around the piece of hide. The bolsters will be from the kip, and the knots will be from black roo lace I ordered separately. The bellies and overlay are going to be cut from a roo hide, and will hopefully result in these three things:
- 4-plait 45-inch belly
- 4-plait 84-inch belly
- 12-plait 144-inch overlay
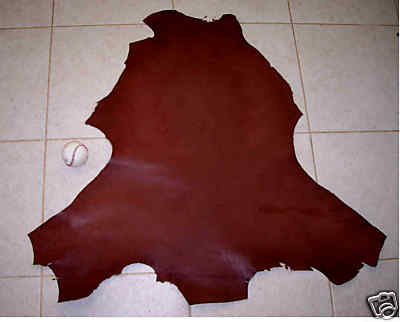
 2008.04.27. The brandy-colored hide arrived and I've begun. Pictured to the right is the hide before and
after I trimmed around the edges to smooth things out (it looks a brighter orange because of the flash, but it's really
a darker brown; the other pics are without flash). I needed a nice smooth edge without sharp corners so I could
cut the strands around the outside in long, continious pieces.
2008.04.27. The brandy-colored hide arrived and I've begun. Pictured to the right is the hide before and
after I trimmed around the edges to smooth things out (it looks a brighter orange because of the flash, but it's really
a darker brown; the other pics are without flash). I needed a nice smooth edge without sharp corners so I could
cut the strands around the outside in long, continious pieces.
 I was quite indimidated. This is the hide that cost
$70 all said and done, and I certainly didn't have much to waste. It's only 55dm2, and I need about 53
or so for what I'm making, but I figured since I'm using separate black lace for the knots I'll have some extra.
Still, I put this off for days, just staring at the roo hide. Trimming the edges off gave me a feel for how the
I was quite indimidated. This is the hide that cost
$70 all said and done, and I certainly didn't have much to waste. It's only 55dm2, and I need about 53
or so for what I'm making, but I figured since I'm using separate black lace for the knots I'll have some extra.
Still, I put this off for days, just staring at the roo hide. Trimming the edges off gave me a feel for how the
 knife cuts through it, and gave me a little more confidence in cutting strands. I started with the 4-plait first belly,
and began down in the lower-left of the hide cutting down across the bottom and up the right side. Each strand
was cut one at a time, leaving them all attached at the bottom in what is called a yoke. The yoke will wrap around
the handle and hold the strands in place as they are plaited.
I still need to cut out the longer second belly and the piece that has me really worried: the 12-strand overlay. Yeah,
that one pretty much has to be perfect.
knife cuts through it, and gave me a little more confidence in cutting strands. I started with the 4-plait first belly,
and began down in the lower-left of the hide cutting down across the bottom and up the right side. Each strand
was cut one at a time, leaving them all attached at the bottom in what is called a yoke. The yoke will wrap around
the handle and hold the strands in place as they are plaited.
I still need to cut out the longer second belly and the piece that has me really worried: the 12-strand overlay. Yeah,
that one pretty much has to be perfect.
 I started by wrapping the yoke around the handle (which already had the core on it) and bound it with some sinew (it's
a waxed thread). I then started a four-plait pattern around the core and continued that until I reached the end of the
core. I tied it off and left the rest of the strands unplaited
I started by wrapping the yoke around the handle (which already had the core on it) and bound it with some sinew (it's
a waxed thread). I then started a four-plait pattern around the core and continued that until I reached the end of the
core. I tied it off and left the rest of the strands unplaited
 (they'll become filler later on). I then attached
the first bolster around this by wrapping it around the handle and binding it with more sinew. The pics on the right
show a bit of extra leather wrapped about the butt of the handle to build that up, too. Louie's instructions call for
lead, but I didn't want to go there.
(they'll become filler later on). I then attached
the first bolster around this by wrapping it around the handle and binding it with more sinew. The pics on the right
show a bit of extra leather wrapped about the butt of the handle to build that up, too. Louie's instructions call for
lead, but I didn't want to go there.
 I started practicing some knots. Eventually, I'll have to tie knots at the top and bottom of the handle. I
used some spare cowhide strands to practice the transition knot that will be at the top of the handle. I followed
the diagram in Ron Edwards' book and it actually came out pretty nice for my first attempt.
It's a 5-part, 4-bight Turk's head knot. I'll have to
practice one with thinner strands to try to double the knot.
I started practicing some knots. Eventually, I'll have to tie knots at the top and bottom of the handle. I
used some spare cowhide strands to practice the transition knot that will be at the top of the handle. I followed
the diagram in Ron Edwards' book and it actually came out pretty nice for my first attempt.
It's a 5-part, 4-bight Turk's head knot. I'll have to
practice one with thinner strands to try to double the knot.
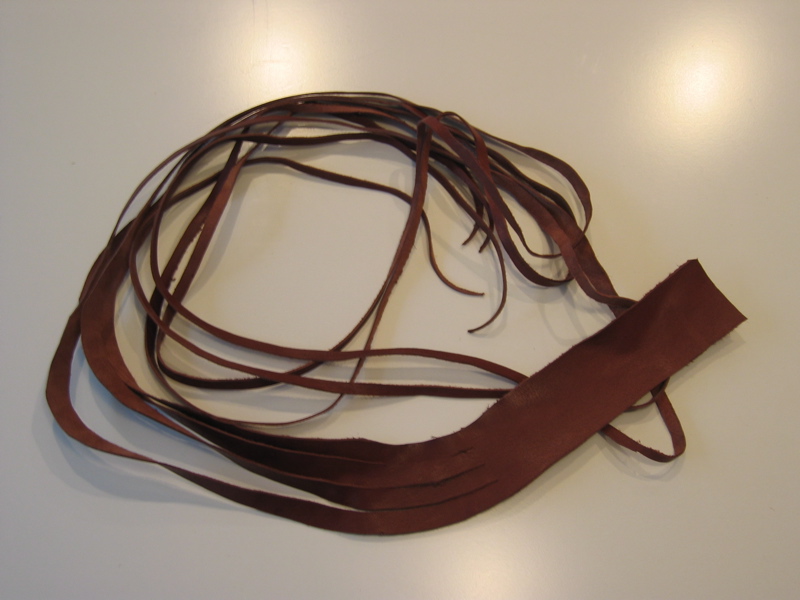
 2008.04.29. The second belly has been cut out; it has four strands and is about 90 inches long. I stretched
and skived the strands so it's ready to go. After a good coat of leather dressing it will get lashed onto the handle
and then plaited around the first belly and bolster. I'm definitely getting better at cutting strands. I just need
to take my time especially in the curvy parts, but fortunately I tend to cut wide in those areas so that's easy to
correct later when skiving.
2008.04.29. The second belly has been cut out; it has four strands and is about 90 inches long. I stretched
and skived the strands so it's ready to go. After a good coat of leather dressing it will get lashed onto the handle
and then plaited around the first belly and bolster. I'm definitely getting better at cutting strands. I just need
to take my time especially in the curvy parts, but fortunately I tend to cut wide in those areas so that's easy to
correct later when skiving.
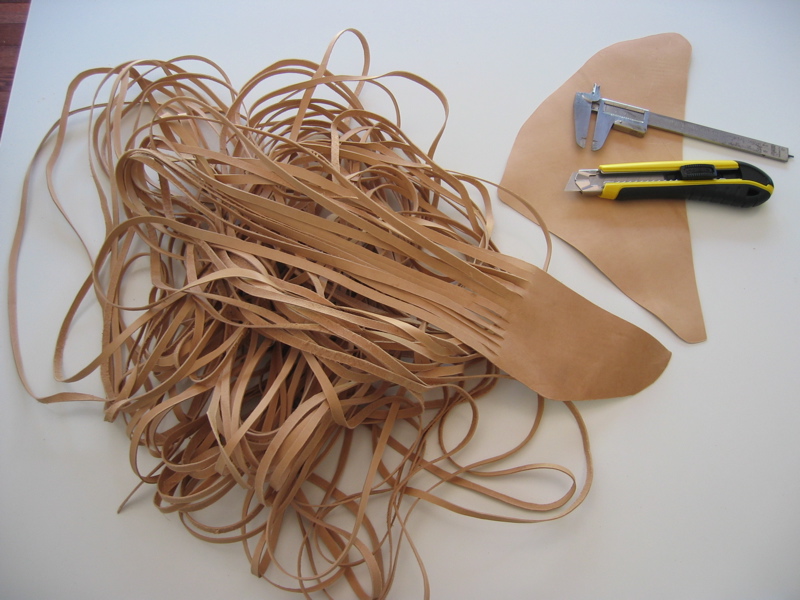
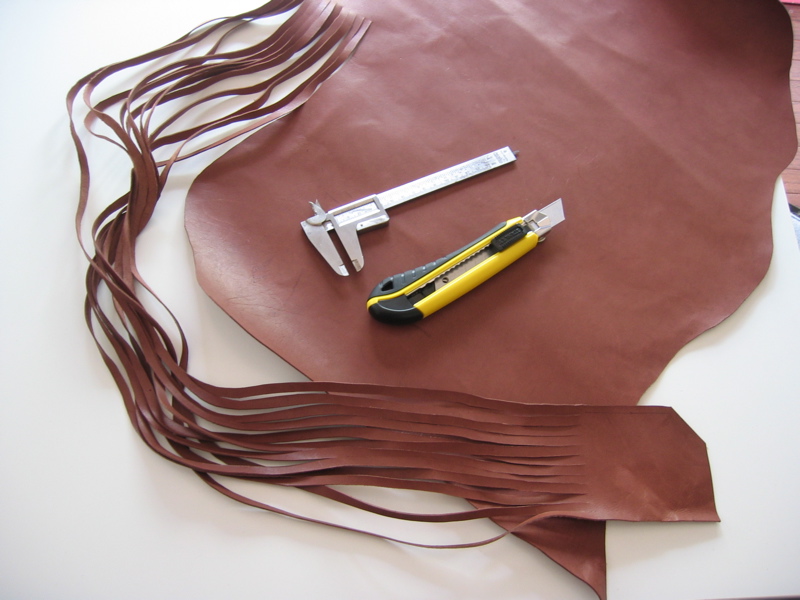 2008.05.04. This weekend saw a lot of activity on the whip. I couldn't put it off any longer; I had to cut out the
12-plait overlay. I was quite apprehensive about the whole thing. I mean, cutting out a 4-plait is nothing compared to this.
I started at the lower-right side, and kept cutting all 12 strands together, about a foot or two at a time. I used my
calipers to make small marks along the way for each strand so I could keep the widths consistent. The overlay started at
2008.05.04. This weekend saw a lot of activity on the whip. I couldn't put it off any longer; I had to cut out the
12-plait overlay. I was quite apprehensive about the whole thing. I mean, cutting out a 4-plait is nothing compared to this.
I started at the lower-right side, and kept cutting all 12 strands together, about a foot or two at a time. I used my
calipers to make small marks along the way for each strand so I could keep the widths consistent. The overlay started at
 7mm strands tapering to 6mm about 6 feet in. The remaining 8 feet were cut at 6mm. I just went very slowly, and 4 or 5
hours later I had an overlay set cut out. I lost track of time somwehere in there and I may have even blacked out for a
while.
7mm strands tapering to 6mm about 6 feet in. The remaining 8 feet were cut at 6mm. I just went very slowly, and 4 or 5
hours later I had an overlay set cut out. I lost track of time somwehere in there and I may have even blacked out for a
while.
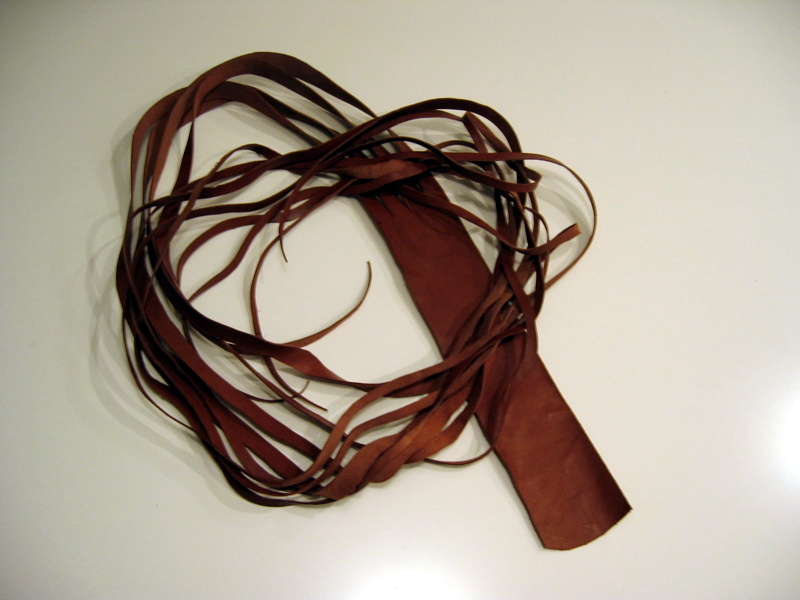
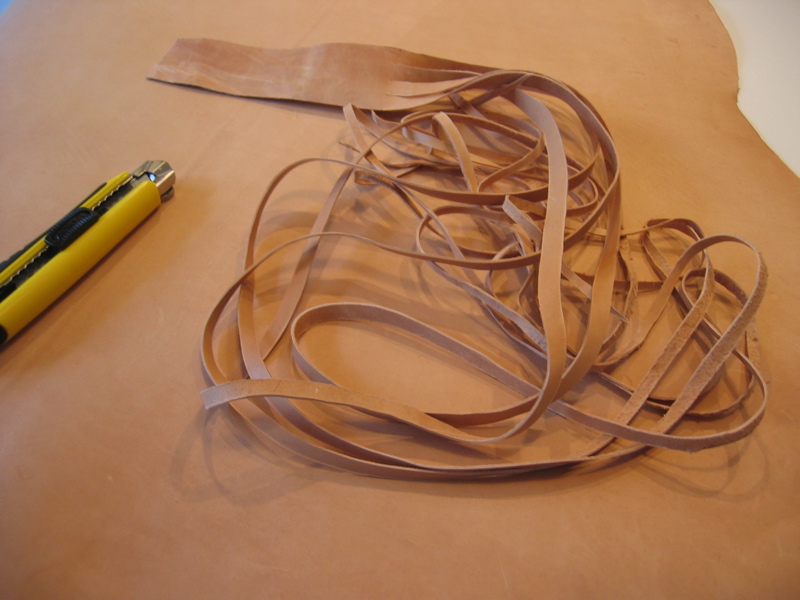
Oh, but the fun didn't end there! I still had to stetch and cut bevels on both edges of all 12 strands, all 14 feet of each. Fortunately, I'm getting pretty good at it already, and each strand took only two long passes on each side. So, I beveled the left edge of all 12, then flipped the whole set over and did the other sides of each strand. I then put leather dressing on the strands and contemplated the immortal words of Socrates, who said "I drank what?".
 The second belly and second overlay were put on a few days ago, so I was all ready to start the overlay plaiting.
I used a staple gun to attach the yoke of the overlay to the butt of the handle. I then began a checkerboard pattern
for the handle. This was pretty easy, just remember over, under, over, under, etc. This went on for about 6.5 inches,
then I transitioned to an under 3, over 3 pattern.
The second belly and second overlay were put on a few days ago, so I was all ready to start the overlay plaiting.
I used a staple gun to attach the yoke of the overlay to the butt of the handle. I then began a checkerboard pattern
for the handle. This was pretty easy, just remember over, under, over, under, etc. This went on for about 6.5 inches,
then I transitioned to an under 3, over 3 pattern.
![]() Once I switched to that, it got a lot faster. For each strand
I was getting ready to put into place, I pulled it tight first, then brought it into place.
After about four and a half feet, the strands started bunching up a bit, so I dropped two strands into the core and
changed to a 10-plait pattern. Hopefully tonight I'll have some free time to continue. I will be plaiting the
10 strands, eventually dropping to 8, then 6. Once I get to the 6-plait, that will continue until the end, at which
point I will have to face another evil nemesis of mine: the fall hitch.
Once I switched to that, it got a lot faster. For each strand
I was getting ready to put into place, I pulled it tight first, then brought it into place.
After about four and a half feet, the strands started bunching up a bit, so I dropped two strands into the core and
changed to a 10-plait pattern. Hopefully tonight I'll have some free time to continue. I will be plaiting the
10 strands, eventually dropping to 8, then 6. Once I get to the 6-plait, that will continue until the end, at which
point I will have to face another evil nemesis of mine: the fall hitch.
Fall, wrist loop, knots
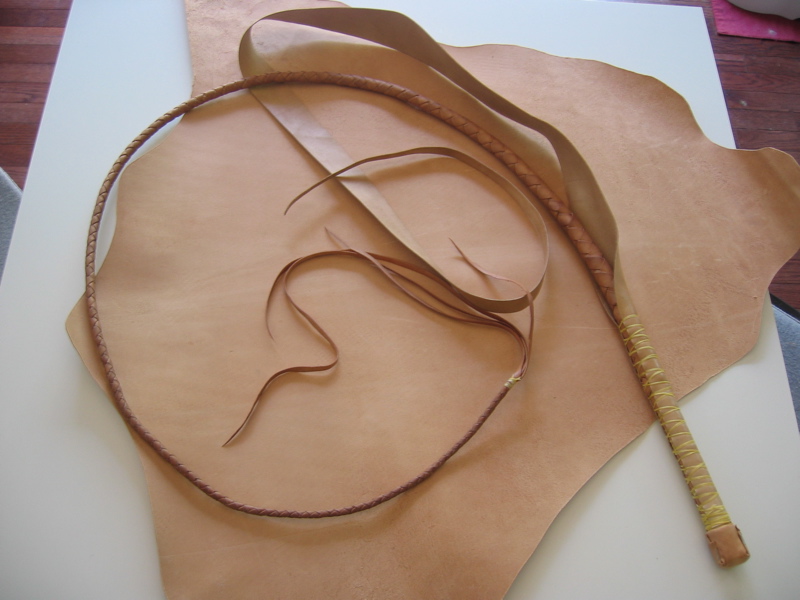
 2008.05.05. At the end of the plaiting, I fed all the strands through the slit in the fall, then tied each strand with a hitch,
resulting in a series of knots all lined up nicely. I pulled the fall down tight and then tied on a cracker at the
end of the fall.
2008.05.05. At the end of the plaiting, I fed all the strands through the slit in the fall, then tied each strand with a hitch,
resulting in a series of knots all lined up nicely. I pulled the fall down tight and then tied on a cracker at the
end of the fall.
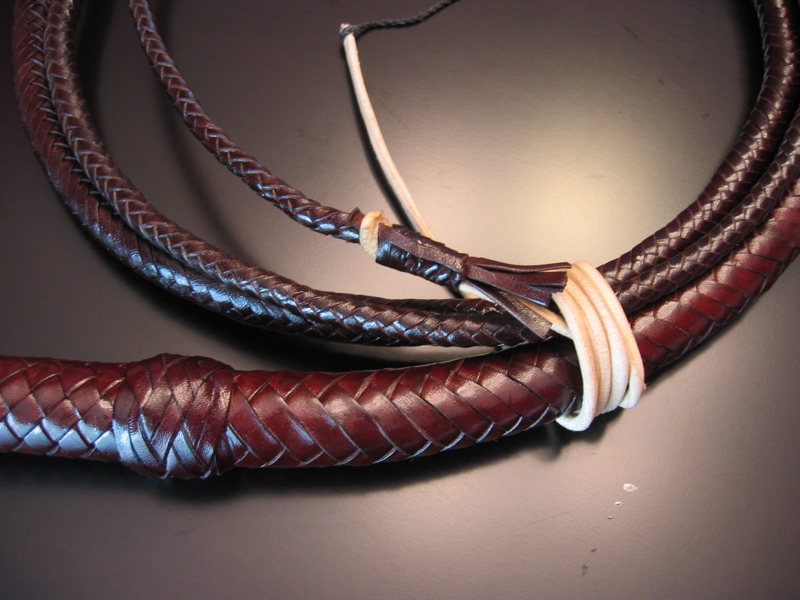
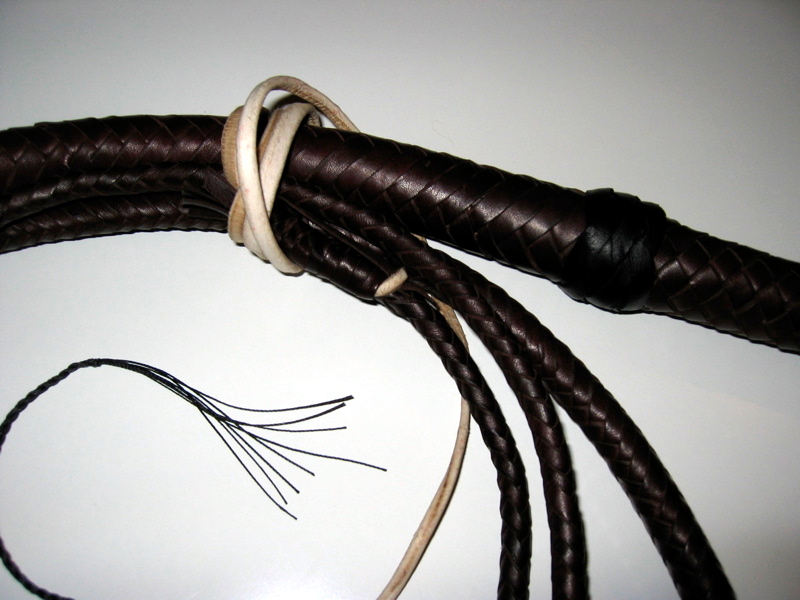
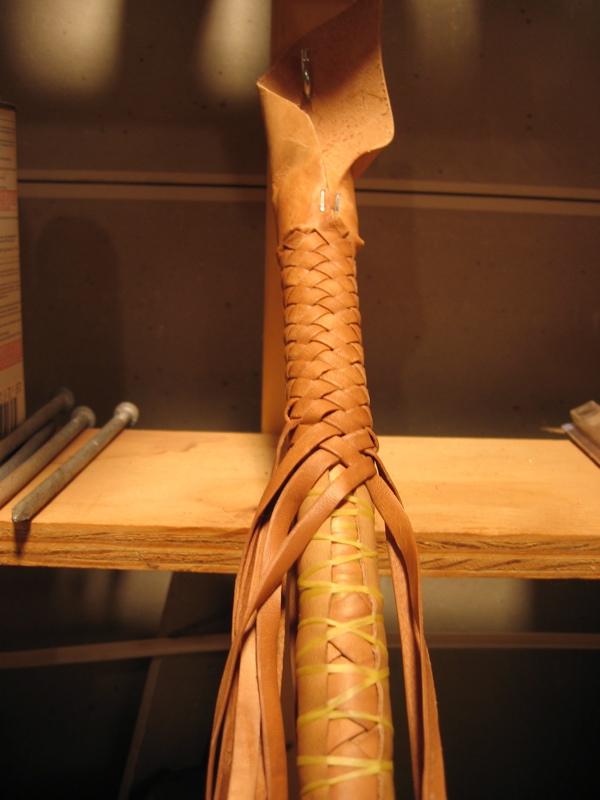
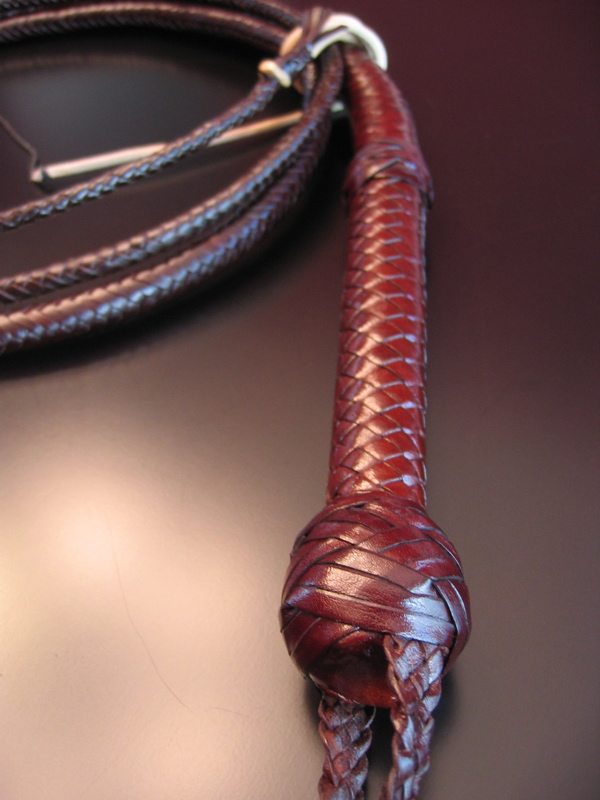
At the handle end of things, I built up the butt more by adding some scrap leather. I made the wrist loop out of four 5mm strands that were about 20 inches long. I used a flat four-plait braid. This was stapled on and tied it all up really well with sinew to get a smooth, round base for the knot. I used some 6mm black roo lace to tie both of the knots. I had been practicing the turk's head knot, so I kinda knew what I was doing. The knot on the butt of the handle was tricky because I had to do a second pass around the whole thing and it got tighter and tighter making it difficult to feed the lace through.
Finished!
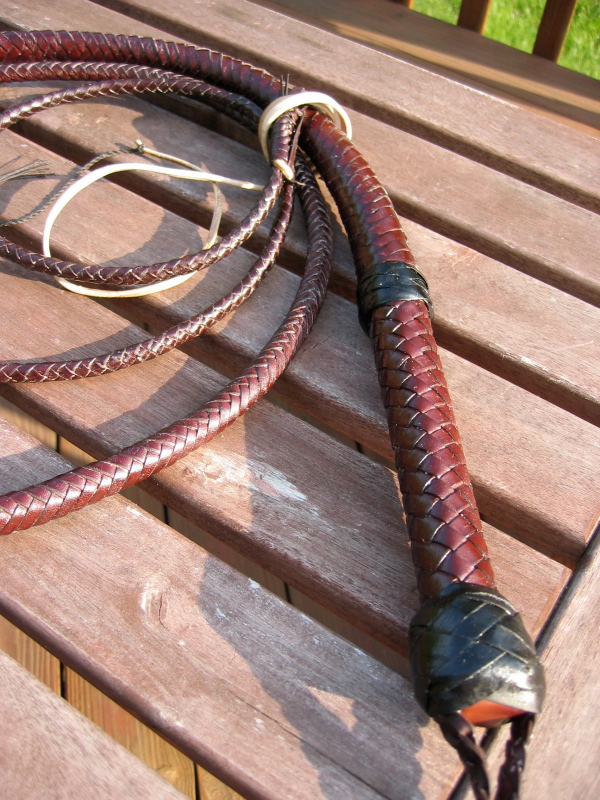
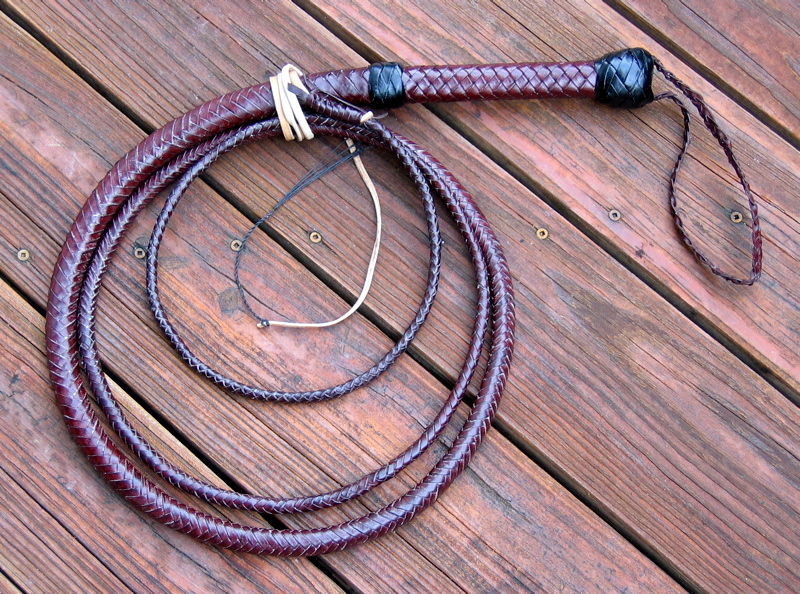
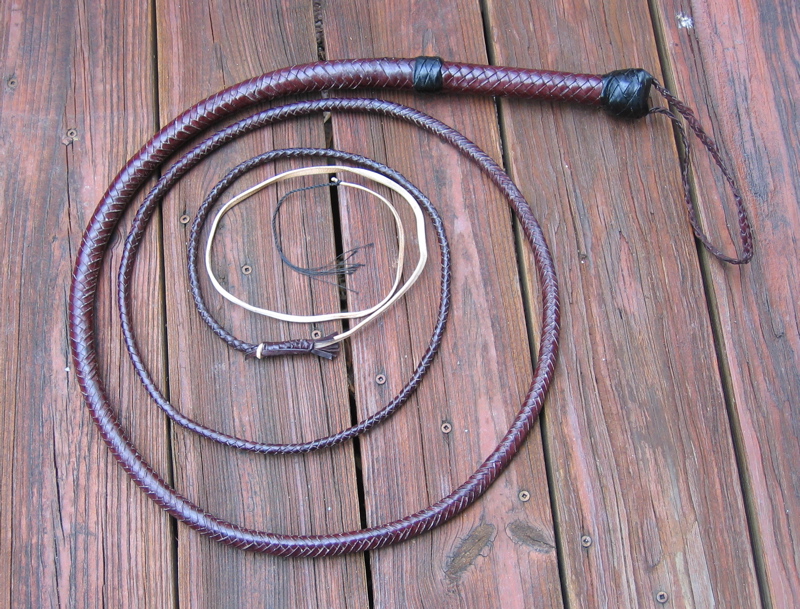
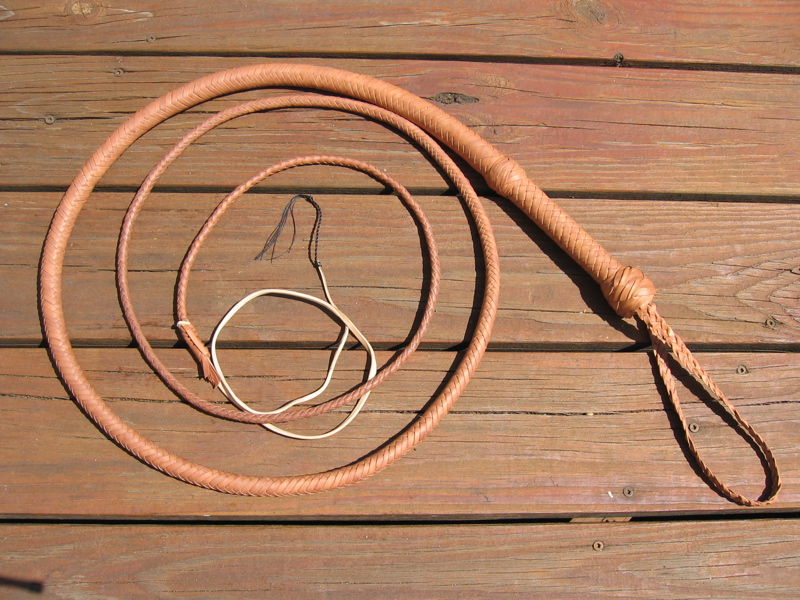
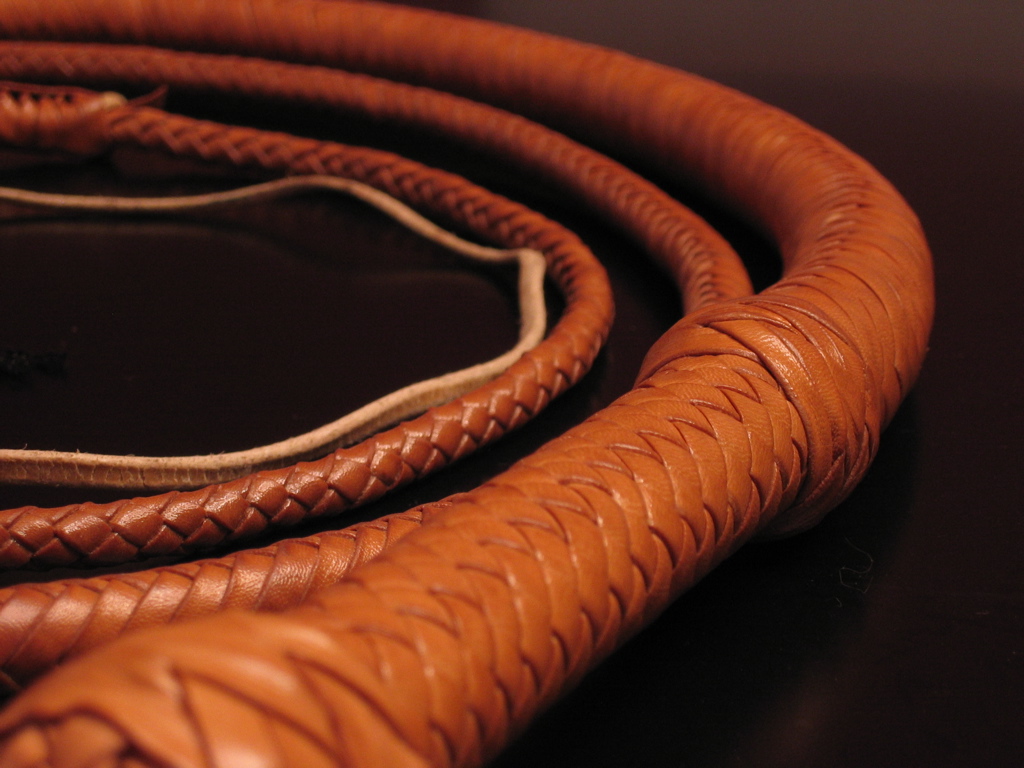
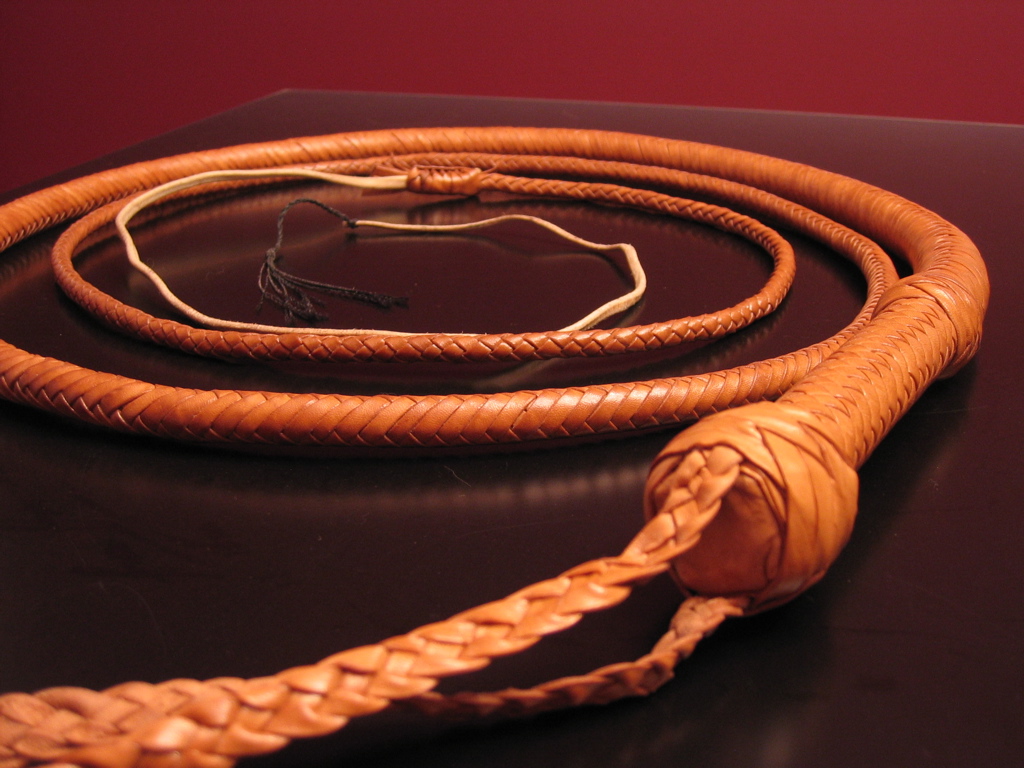
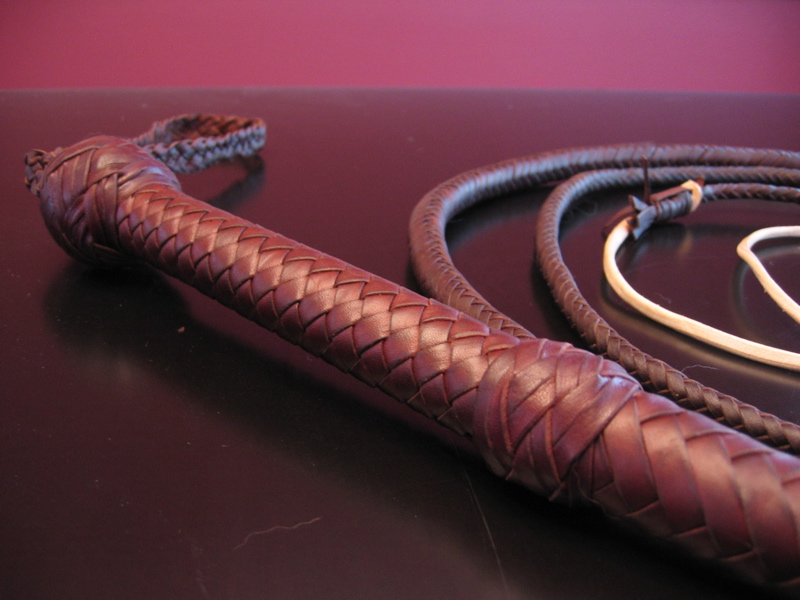
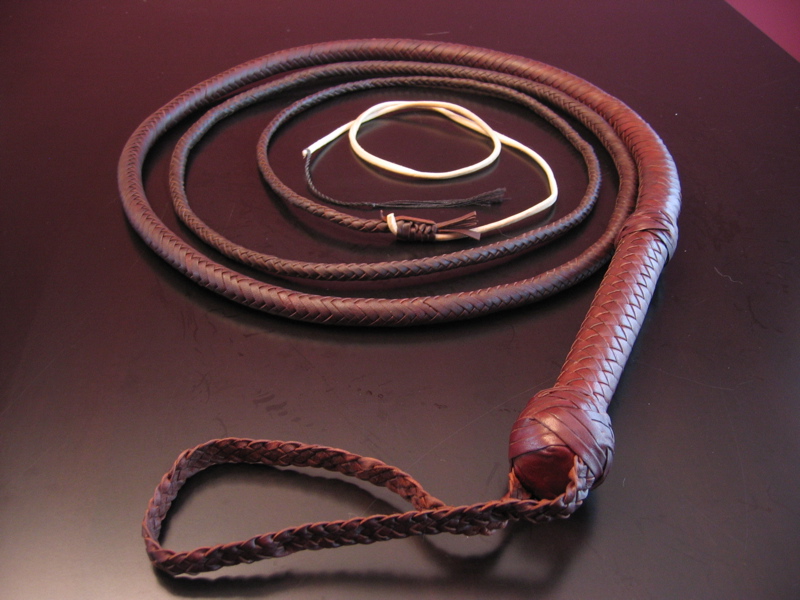
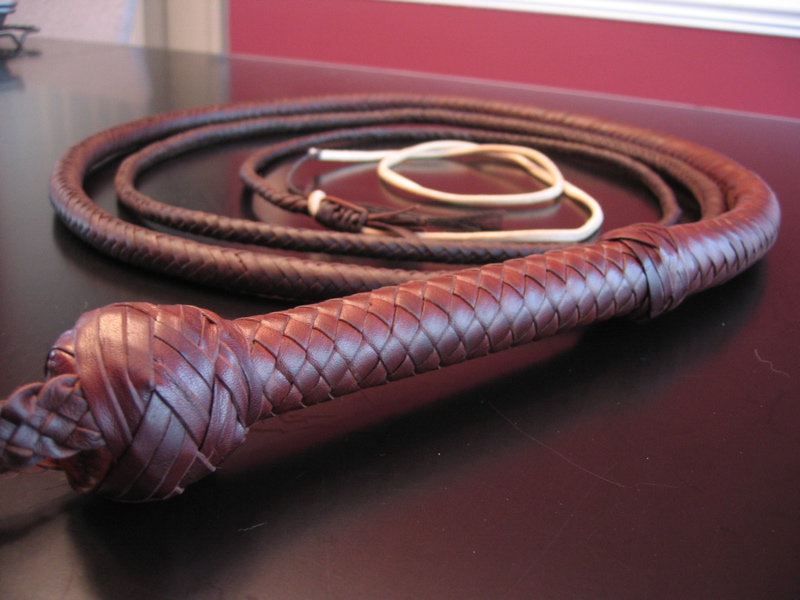
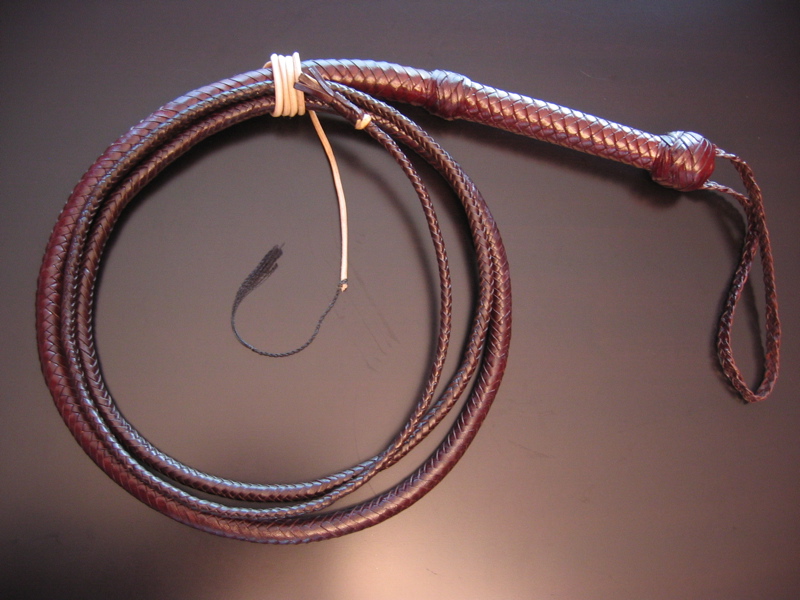
I found some shellac at the local home improvement store, and put the first coat on. It's amazing the difference it makes! One more coat and the bullwhip is finished! It came out to be a 9-footer, which I think is pretty respectable for my first bullwhip. There are, of course, a number of imperfections and things I know I should have done better, but that's why this is a learning experience. My next whip will be better as I learn from this one and improve. So, here it is: A 12-plait 9-foot kangaroo bullwhip.
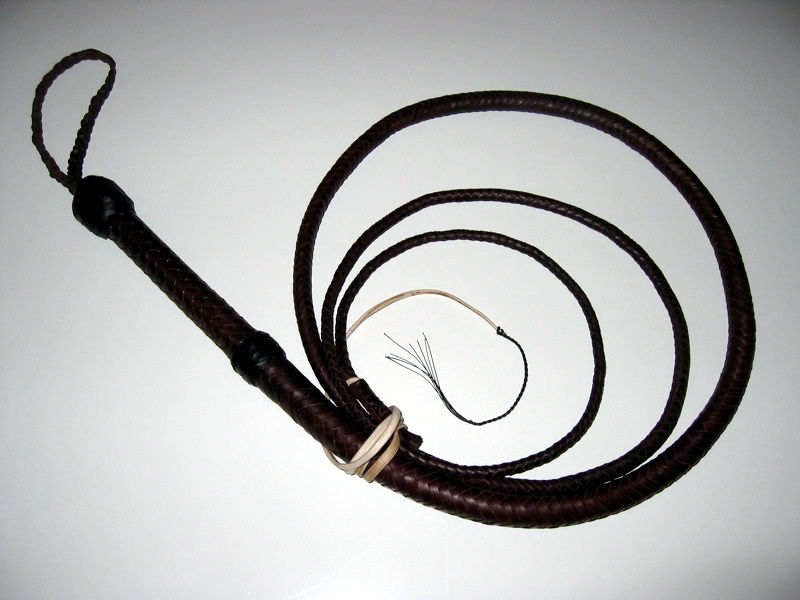
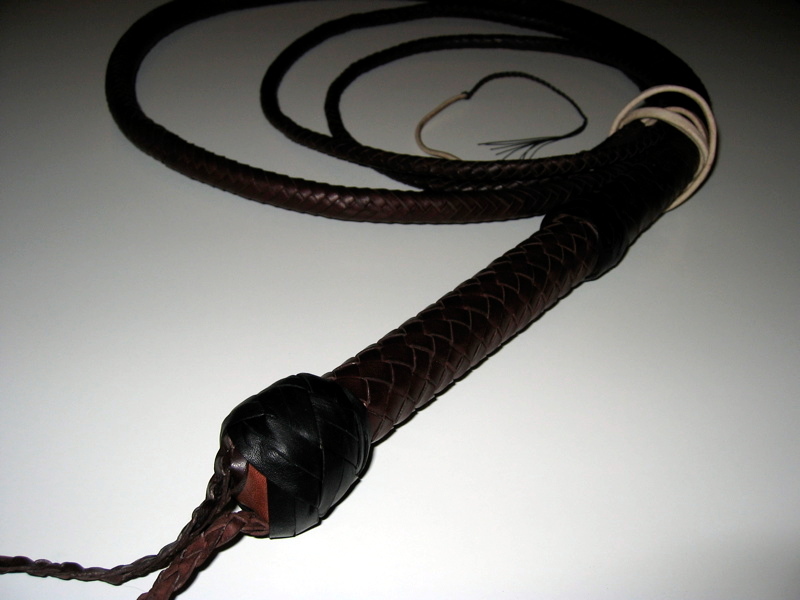
These pictures came out really dark with the flash, and they were taken before the shellac was applied, so I'll snap some more
soon in sunlight. It's difficult to see the detail with the dark brown and black colors.
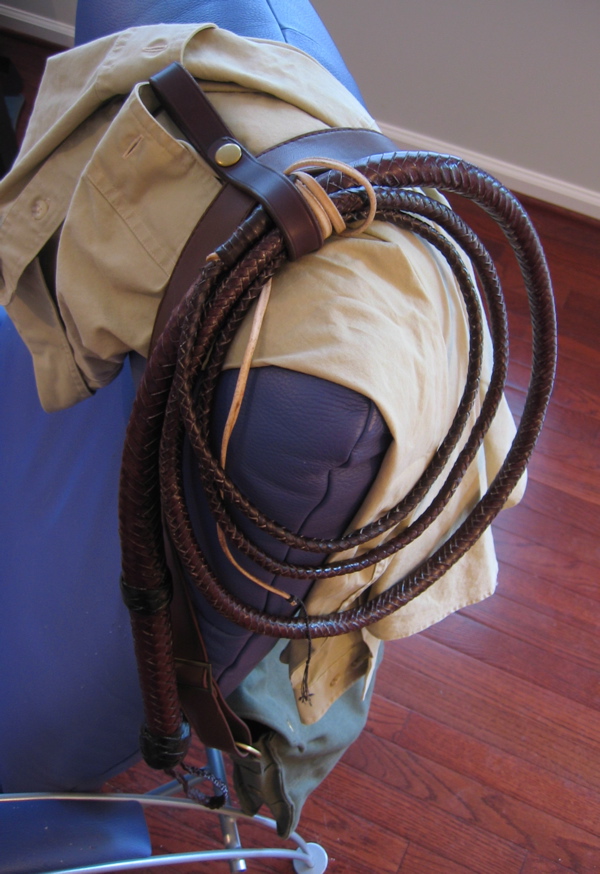
Natural Kangaroo 12-plait Bullwhip
 2008.05.20.
I've started my second whip with the natural hide I received from Hardtke. It's a 61dm2 hide that
is much better quality than the first hide I used. This time I'm going to be extending the bolsters a bit
more to move some weight out farther into the thong. I'm also making sure to log the time I take at each
step so I have a better idea at how much total time I put into the finished product. With work and all, I usually
can only find a half hour here and there in the evenings. So far I've cut out the core and bolsters from
the kip hide, attached the core to the handle nail base, trimmed the edges around the roo hide, and cut out the first 4-plait belly.
2008.05.20.
I've started my second whip with the natural hide I received from Hardtke. It's a 61dm2 hide that
is much better quality than the first hide I used. This time I'm going to be extending the bolsters a bit
more to move some weight out farther into the thong. I'm also making sure to log the time I take at each
step so I have a better idea at how much total time I put into the finished product. With work and all, I usually
can only find a half hour here and there in the evenings. So far I've cut out the core and bolsters from
the kip hide, attached the core to the handle nail base, trimmed the edges around the roo hide, and cut out the first 4-plait belly.
 2008.05.23. I've found some time to plait the first belly, attach the first bolster, and cut out the second
belly that ended up having strands about 94 inches long. I'll be plaiting the second belly and attaching the second
bolster today. With any luck, this second whip should be finished this weekend!
I still get nervous cutting strands, but the rest of the process is getting easier now that I've already done all this
before.
2008.05.23. I've found some time to plait the first belly, attach the first bolster, and cut out the second
belly that ended up having strands about 94 inches long. I'll be plaiting the second belly and attaching the second
bolster today. With any luck, this second whip should be finished this weekend!
I still get nervous cutting strands, but the rest of the process is getting easier now that I've already done all this
before.
 2008.05.25.
The second belly and bolster have both been finished, and after three hours, the overlay has been cut out. The
overlay is a 12-plait, 14-foot long overlay, so the finished whip should be just about 9 feet long if all goes
well. The next step is to stretch and bevel the strands, then apply leather dressing.
2008.05.25.
The second belly and bolster have both been finished, and after three hours, the overlay has been cut out. The
overlay is a 12-plait, 14-foot long overlay, so the finished whip should be just about 9 feet long if all goes
well. The next step is to stretch and bevel the strands, then apply leather dressing.
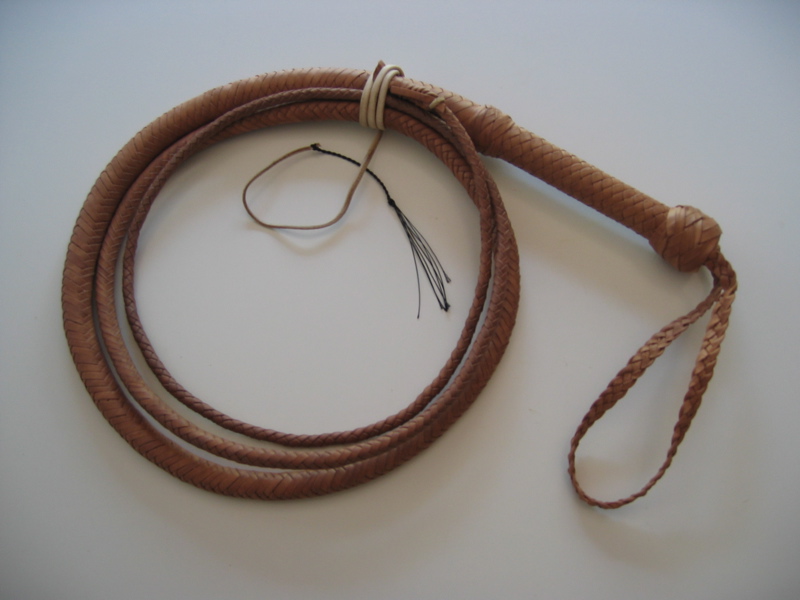
Second bullwhip finished!
2008.05.26. The holiday weekend allowed some extra time to work on it, so the whip is all finished save for a coat of shellac. The overlay was prepared and plaited, which took a few hours. At the end of the thong the fall was attached and a fall hitch put in place to hold it all together. The wrist loop was then plaited and attached, and the two knots were braided around the handle top and bottom. I kept a log of the time it took to do each step along the way; this whip took me just over 13 hours to make from start to finish.

Third bullwhip
2008.06.13. I started my third whip using a brandy-colored 58mm hide that was just delivered. So far I have the core, first belly, first bolster, second belly, and second bolster all attached. The 12-strand overlay has been cut out but still needs to be stretched, skived, and dressed before the overlay plaiting can begin. Next week is my vacation, so it'll have to wait. In braiding the bellies I've been trying to get some more weight into this one by keeping the strands a bit thicker and using longer bolsters. The butt knot is also going to be larger with a three-pass turk's head to match more of the Raider's Indy whip style.
All of this is more learning material so when I make my fourth whip (natural-tan 10-foot roo) it can be as close as possible to the David Morgan whip seen in Raiders of the Lost Ark. My handles aren't quite right because of the butt knot, my wrist loop isn't 6-strand, and the thong tapers a bit too early, so that's why I'm working on all those points now.
2008.06.24. Last night I had an hour of free time so I prepared the overlay strands for plaiting. This meant stretching the strands, beveling each strand twice, then applying leather dressing. I'm hoping to plait at least the handle checkerboard pattern and the first foot or so of the thong tonight. Still need to cut out the wrist loop strands and braid that - I'm going for a 6-strand instead of the 4-strand I have been making.
2008.06.27. I have about one and a half feet of plaiting left; I'm at the transition from 8-plait down to 6-plait and then that will go until the end. Hopefully tonight that'll be finished and then I'll plait the wrist loop, tie on the fall, and braid the knots on the handle. Should be finished soon and will post some pictures.
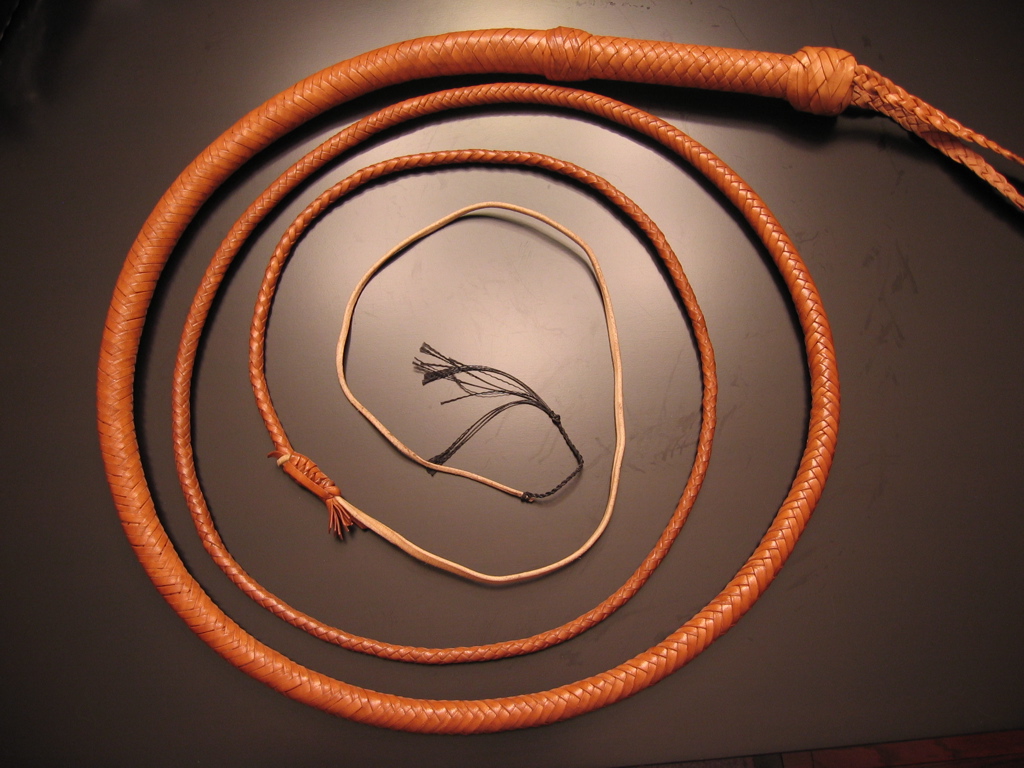
Third bullwhip finished!
2008.06.28. All finished with my third whip, which is a 12-plait, 10-foot kangaroo bullwhip. I decided to use the same brandy kangaroo hide for the knots for a uniform look, and my wrist loop is 5-plait. The turks head knot at the end is a three-pass, which is something new for me. Overall I'm quite happy with it, and it cracks very easily. Still need to apply a coat of shellac.
After the shellac:

You can find all of my whipmaking photos over on my Picasa album.
Fourth bullwhip
2008.07.09. After my first three, I've learned some valuable lessons, and am using my fourth whip as a way to try to get all the bits just right. There are several things I will be doing differently with my new whip, which will be a 10-foot, 12-plait natural-color kangaroo hide:
- Pull the strands much tighter before plaiting.
- Watch for gaps! When a gap forms, I'll unbraid if I have to and close up the gaps.
- Leave a couple more strands in the core all the way to the fall hitch.
- Use a much longer set of bolsters for more weight and better taper in the thong.
- Use a six-strand wrist loop.
2008.08.07. Haven't ordered the new hide I need yet, but I managed sell my second bullwhip! I put it on eBay to see what I could get to cover materials (the new hide). Well, I ended up getting enought to material costs, so I'll be ordering both a saddle-tan and a natural hide soon.
2015.01.24. Wow it's been a while, but I'm finally making that fourth bullwhip. Natural roo hide, 10', 2 belly, 2 bolster, 12 plait. Details to come...
2015.01.31. It's done!
Links
- Louie's bullwhip blog - THE resource. Start back at his first posts and be amazed as his skill progresses. Such a great site and gave me the motivation to try this myself.
- Club Obi-Wan - Indy gear discussion
- Murphy Whips
- David Morgan
- Dittmer freestyle whips - a good tutorial on making a bullwhip.
- Northern Whip Co. - Just look and drool at Joseph Strain's whips.
- Tandy Leather